mybonk-wiki
Baby rabbit holes
Ordered list of “basic” skills that need to be acquired to enjoy the ride.
Applies to Linux, whatever the distribution, although we use NixOS ourselves and have a section dedicated to it.
Go through this slowly. It is tempting to speed-read through a book, call it done, and move on to the next book.
To get the most out of this, take your time understanding each section.
For every 5 minutes you spend reading you should spend 15 minutes tinkering around with what you just read. Play around, copy/paste, break things, have fun.
A good general cheat sheet page: https://github.com/ruanbekker/cheatsheets#readme
UNIX vs. Linux? What’s the difference?
Good read on how Unix started and influenced Linux: [https://www.redhat.com/sysadmin/unix-linux-history]

First steps with command-line
A shell is a user interface for access to an operating system’s services.
A terminal is a program that opens a graphical window and lets you interact with the shell.
It is common that the keyboard layout the system is configured with is different from the keyboard you actually use (e.g. system keyboard configured US layout but you use a keyboard with a French layout), read this article “https://www.baeldung.com/linux/console-change-keyboard-layout” to fix this.
A CLI (command-line interface) is what you deal with when you interact with the shell.
RTFM!
The most important command is man which stands for “manual”. It explains what the command is and how to use it. Don’t spend hours on youtube, read the manuals. e.g.
  $ man git

  NAME
          git - the stupid content tracker

  SYNOPSIS
          git [-v | --version] [-h | --help] [-C <path>] [-c <name>=<value>]
              [--exec-path[=<path>]] [--html-path] [--man-path] [--info-path]
            [-p|--paginate|-P|--no-pager] [--no-replace-objects] [--bare]
            [--git-dir=<path>] [--work-tree=<path>] [--namespace=<name>]
            [--config-env=<name>=<envvar>] <command> [<args>]


  DESCRIPTION
          Git is a fast, scalable, distributed revision control system with an unusually rich command set that provides both high-level operations and full access to internals.

  [...]
- Hit
hfor help andqto leave the manual. - scroll through the manual using ‘arrow up’ and ‘arrow down’.
- Jump pages up and down using ‘space bar’ and ‘Shift + space bar’.
- Search for a term in a manual using
/e.g./ignorethen hit:nfor next matchShift + nfor previous match
- Search for a term in all the manuals: Use
apropos.
Most common commands
- System version
- OS name and version in Linux:
cat /etc/os-release
- Linux kernel version:
hostnamectl
- OS name and version in Linux:
- Terminal / iTerm2 (features).
- iTerm2 hotkeys:
- toggle maximize window:
Cmd+Alt+=. - toggle full screen:
Cmd+Enter. - make font larger:
Cmd++. - make font smaller:
Cmd+-.
- toggle maximize window:
- Clear the terminal window:
clear. - Reset your terminal when it gets messed up by control sequences:
reset.
- iTerm2 hotkeys:
- Shell:
bashand its history (sh, csh, tsh, ksh …).zshpronounced Z shell, isbashon steroids with extended features and support for plugins and themes, most noticeably:- Automatic cd: Just type the name of the directory without
cd. - Recursive path expansion: e.x. “/u/lo/b” expands to “/usr/local/bin”.
- Spelling correction and approximate completion: Minor typo mistakes in file or directory names are fixed automatically.
- Plugin and theme support: This is the greatest feature of Zsh. Use Oh My Zsh manage these effortlessly (list of plugins HERE).
- Automatic cd: Just type the name of the directory without
- fzf (Fuzzy Finder): A tool that can change your tech life into “before” and “after” parts.
-
Environment variables in Linux-based systems:
- Read “how environment variables work” (www.howtogeek.com/668503/how-to-set-environment-variables-in-bash-on-linux)
$ printenv: Print all the environment variables.$SHELL: The default shell being used on the system (e.x.zsh,bash…).$PATH: Instructs the shell which directories to search for executables, it allows to run commands without having to specify its full path.- .etc…
$ export EDITOR=vi$ echo $EDITOR- .etc…
- Read “how environment variables work” (www.howtogeek.com/668503/how-to-set-environment-variables-in-bash-on-linux)
- Shell commands you must know really well :
!!calls previous command again,!!:0calls previous command without its arguments,!!*: Repeats the previous command arguments only (skips the command name),!?string: Runs the most recent command containing “string”,man: User manual of given command.apropos: Search all the man pages using keywords to find commands and their functions (read this).whatis: Display manual documentation pages in various ways.pwd(print working directory),ls(list,ls -t,ls -sto sort by last modified date),cd(change directory),type(determine the type of a command),mkdir(make directory),mv(move),rm(remove),ln(and know the difference between a “soft” and a “hard” link),which(identifies “which” executable will be run when a command is issued),stat(provides detailed status information or metadata about a file or directory),whereis(used to locate the binary, source, and manual files associated with a command),cat(concatenate files and display their combined content),head,tail,more,tee…uname -a,hostname,whoami,id,passwd,chown,chgrp,chmod,adduser,userdel,usermod, …uptime: Tell how long the system has been running.ip a: Tells you the IP address of your system.su/sudo,doas: Used to assume the identity of another user on the system (they are both similar tools,doashas been ported from the OpenBSD project and could be assumed “safer” thansudoas it is less error-prone e.g. when setting up somewhat complicated patterns in/etc/sudoers).historyecho "$HISTFILE": Points to the file where your shell history is stored.set +o historyandset -o history: Temporarily disable and enable logging history, respectively.history | grep [string]: Find any record in history.history -c: Remove all records.history -d 1234: Remove record number 1234.history -aandhistory -r: Append or read entries to/from the history list. Very convenient to move commands history across from one of your terminals to another. You could automate this by defining the environment variablePROMPT_COMMAND(the$PROMPT_COMMANDis run before a prompt is shown on the terminal) e.g.PROMPT_COMMAND="history -a; history -r".
- Don’t forget to explore ‘i-search’ and ‘reverse-i-search’ using
Ctrl+sandCtrl+rrespectively; Read this if ‘i-search’ usingCtrl+sdoes not work.
aliasgrep:- On a file:
- Most basic use: all the lines containing ‘keyword’:
$ grep 'keyword' /path/to/file.log - To also show the 5 lines before and the 2 lines after the keyword occurrences as well as highlighting the occurrences in color:
$ grep -B 5 -A 2 --color 'keyword' /path/to/file.log - Exclude a single pattern using the the -v flag:
grep -v "pattern" file:# journalctl -n 50 |grep -v "sudo" - Exclude multiple patterns using the -e flag combined with the -v flag:
# journalctl -n 50 |grep -v -e "sudo" -e "background"
- Most basic use: all the lines containing ‘keyword’:
- On directories: Find all files containing specific text
- Search all the files in a given directory:
grep -rnw '/path/to/somewhere/' -e 'pattern' - Only search through those files with
.cor.hextensions:grep --include=\*.{c,h} -rnw '/path/to/somewhere/' -e "pattern" - Exclude searching all the files with
.oextension:grep --exclude=\*.o -rnw '/path/to/somewhere/' -e "pattern" - Exclude one or more directories using the
--exclude-dirparameter. For example, this will exclude the dirsdir1/,dir2/and all of them matching*.dst:grep --exclude-dir={dir1,dir2,*.dst} -rnw '/path/to/search/' -e "pattern"
- Search all the files in a given directory:
tee: a command in command-line interpreters using standard streams which reads standard input and writes it to both standard output and one or more files, effectively duplicating its input. It is primarily used in conjunction with pipes and filters. The command is named after the T-splitter used in plumbing.
- On a file:
watch: Execute a program periodically showing output in fullscreen e.g.$ watch 'du -ac -d0 /data/bitcoin/blocks'$ watch -n 2 'bitcoin-cli -getinfo | grep progress'md5sum: Calculates and verifies 128-bit MD5 hashes as a compact digital fingerprint of a file. There is theoretically an unlimited number of files that will have any given MD5 hash.sha256sum: Similar to md5 but based on 256-bits, considered more secure and less prone to theoretical collisions.- Command to search for files through directories:
find /search/directory/ -name "matching file search criteria" -actionsfind /dir/to/search -name "pattern" -printfind /dir/to/search -name "file-to-search" -printfind /dir/to/search -name "file-to-search" -print [-action]
The importance of Git / GitHub
“If your work is not on Github it does not exist”
-Ben Arc
GitHub (or GitLab or other alternative) is a platform on the Internet used for storing, tracking, and collaborating on projects. It makes it easy to share all sorts of files and collaborate with peers in an asynchronous but coordinated way. GitHub also serves as a social networking site where developers can openly network, collaborate, and pitch their work.

- Manual:
$ man git - How to fork a repository (instructions here).
- What is a “pull request”? (video explanation): https://www.youtube.com/watch?v=For9VtrQx58.
-
What is
stash/pop, when to use them: https://www.youtube.com/watch?v=urSlkC-6lZE. - Commonly used:
- Your identity
- The first thing you should do when you install Git is to set your user name and email address. This is important because every Git commit uses this information, and it’s immutably baked into the commits you start creating:
$ git config --global user.name "John Doe"
$ git config --global user.email johndoe@example.com
- The first thing you should do when you install Git is to set your user name and email address. This is important because every Git commit uses this information, and it’s immutably baked into the commits you start creating:
more ~/.gitconfiggit config -lgit config user.namegit clone https://github.com/mybonk/mybonk.gitgit remote show origingit remote set-url: You may need to change the connection type to GitHub from https to ssh (if you use private-public keys to connect). This is done by using thegit remote set-urland changinghttps://github.com/mybonk/mybonk.gitbygit@github.com:mybonk/mybonk.git.$ git remote set-url origin git@github.com:mybonk/mybonk.gitgit statusgit showgit log main --graphgit branchgit switchgit checkout origin/main/git checkout origin/main <file_name>git add ./git add -a/git add -Agit mv filename dir/filenamegit restore --staged file-to-unstage.txt: Unstage a file in the Git index and undo a git add operation. Command introduced in 2019 as (Git 2.23). Are NOT recommendedgit rm(may remove the file not only from the index, but also from the repo altogether) andgit reset(is “too powerful” and may result in rewriting of branch history).git commit -m "commit message"git push/git push -u origin maingit pullgit refloggit remote set-url origin https://git-repo/new-repository.git/git remote set-url <remote_name> <ssh_remote_url>/git remote -vgit diff <dir or file name>git log/git log --oneline/git log -S "signet" --pretty=format:'%h %an %ad %s'git blame README.md(also try the options-e,-w,-M,-C,-L 1,5)git stash push/git stash list/git stash pop/git stash apply - Your identity
Make it simpler to deal with the key to connect to git hub?
The interactions with git are now exclusively through “deployment keys”. These “deployment keys” is basically GitHub managing a list of authorized public keys to decide who can do what. So you need one of your public keys copied within in the “deployment key” properties section in your repo on GitHub.
Now to interact with github you’ll need to authenticate using your private key. “juggling” with keys is not ideal. A key can be passed in different ways (by argument, by using ssh-agent) but we recommend is the following effective approach: Define a host named gh in ~/.ssh/ssh.config:
Host gh
  Hostname github.com
  User git
  IdentityFile ~/.ssh/myprivatekey
Test the connection works (-T to disable pseudo-terminal allocation and -v for verbose so you actually see what’s going on at connection time, the last output message should be along the line of You've successfully authenticated, but GitHub does not provide shell access.):
$ ssh -Tv gh
And your command becomes:
$ git clone gh:me/myRepo
No more git@... since the config file includes User git.
How to fork after cloning?
I cloned a git repo to my local machine, played around with it a bit and found it cool.
Now I would like to keep the result as I modified it in my own github space. How can I proceed?
I suppose the regular way would have been to fork the repo on the first place to my space, clone it, modify and then push it to GitHub, but now I cloned the original’s author repo, how can I commit that as a new thing in my personal?
ANSWER:
First rename the old remote as upstream, in case you want to be able to keep in sync with the original repository.
git remote rename origin upstream
Then add your forked repository as origin:
git remote add origin https://github.com/<your-username>/<your-project>
Or if you’re using ssh:
git remote add origin git@github.com:<your-username>/<your-project>.git
To push to your repository:
git push -u origin master
To pull from the base repository:
git pull upstream
It is recommend you do all of your work in a separate branch, not the master branch. It will be easier to rebase to the upstream/master branch in case you want to make a pull request.
You don’t really have to rename the origin to upstream - the remote names can be arbitrary, but it is recommended to keep up with the naming convention used by GitHub.
Good to know
- What is the difference between merge and rebase?
- How to Setup Passwordless Authentication for git push in GitHub.
- Switch to another branch (on the command line).
- Switch GitHub account in terminal (on the command line).
Git front ends
Using one of the following might saves you time by simplifying your interactions with Git.
- Lazygit: Nice command-line based Git front-end.

- Source Tree: Graphical GUI desktop client. Here are good simple tutorials to get started.

-
Ungit: “The easiest way to use git. On any platform. Anywhere.”

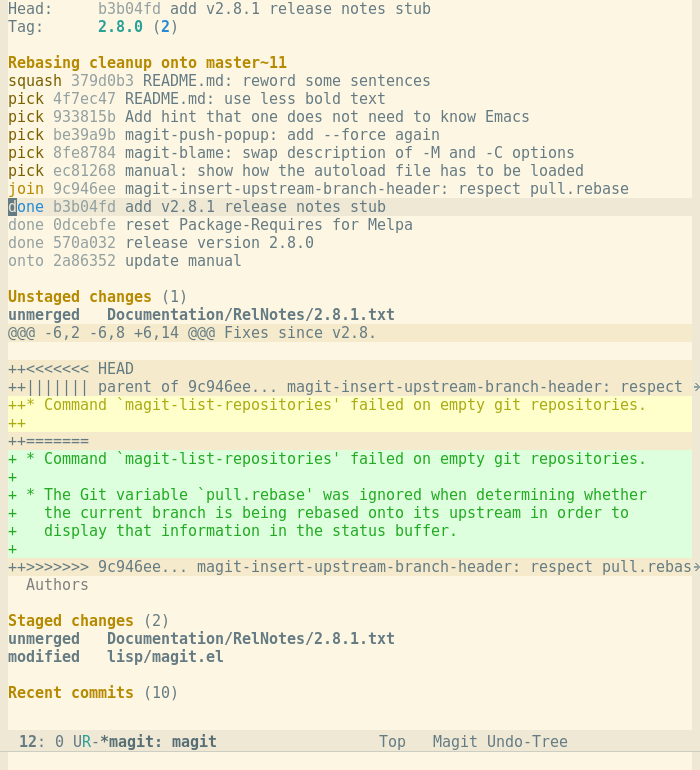
- Magit!: Version control system Git, implemented as an Emacs package.
GitHub CLI
Command-line tool that brings pull requests, issues, GitHub Actions, and other GitHub features to your terminal, so you can do all your work in one place.
Authenticate with your GitHub account:
$ gh auth login
Text processing
vi(cheat-sheet HERE)$ vi +132 myfile: Open myfile on line 132:%d: Delete all lines (%meaning all lines andddelete).
sed(https://www.gnu.org/software/sed/manual/sed.html): “stream editor” for editing streams of text too large to edit as a single file, or that might be generated on the fly as part of a larger data processing step: Substitution, replacing one block of text with another.awk(https://github.com/onetrueawk/awk/blob/master/README.md): Programming language. Unlike many conventional languages, awk is “data driven”: you specify what kind of data you are interested in and the operations to be performed when that data is found.- jq: Lightweight and flexible command-line JSON parser/processor. reference
- rg (also known as
ripgrep): Recursively search the current directory for lines matching a pattern, very useful to find whatever document containing whatever text in whatever [sub]directory.$ rg what_i_am_looking_for MyDoc_a.php MyDoc_b.phpLook for string ‘what_i_am_looking_for’ in MyDoc_a.php and MyDoc_b.php$ rg what_i_am_looking_for MyDoc.php -C 2: Return results with context, displaying 2 lines before and 2 lines after the match in the output. Also try the options-Band-A(number of lines before and after the match).$ rg 'Error|Exception' MyDoc.php: Searches the file for eitherErrororException.$ rg 't.p' MyDoc.php: Looks for atand apwith any single character in between.$ rg ssl -i: Recursively searches for instances of ssl in a case-insensitive manner.$ rg service /etc/var/configuration.nix -i: Recursively searches a specific directory for instances of service in a case-insensitive manner.rg -g 'comp*' keySearches only for the patternkeyin files beginning with the substringcomp.-loption to only list the files having a match without additional details/-ioption for case-insensitive search.-Soption for smart case search.-Foption to treat the search string as a string literal (regex syntax).$ rg --type-listList of the available file types.$ rg key -t jsonRestricts the search for the pattern key to json files only.
- more, less, most: Terminal pagers. They are used to view files page by page, and/or line by line, each having their own prominent feature or advantage.
- pandoc: Pandoc is best described as a “universal document converter”. It can convert between numerous markup and word processing formats including various flavors of Markdown, HTML, Word docx, pdf .etc…
Example to renderREADME.mdso that it is nicely formatted and readable on a terminal:$ pandoc -t plain README.md | less
File processing
$ tar -xvf myfile.tar.gz: Untar a file.
Processes
setsidcommand that allows programs to run independently of the terminal that launched them, making it an ideal solution for running long-lasting background jobs or services. In the background this command calls fork if already a process group leader, else it executes the program in the current process.
File system / Block devices
lsblk: List information about the system’s available or the specified block devices (e.g. disks, USB sticks …).- Test block device performances:
hdparm -t --direct /dev/sda1(if not installed run nix-shell -p hdparm). df: “Disk Free” displays disk usage:df -hT.-hfor “human readable”, add-Tto display the type of the filesystem.df -hT .. ‘.’ for whatever partition the current directory is residing on.df -hT -t ext4.-t ext4to display only filesystems of type ext4.df -hT -x squashfs -x overlay -x tmpfs -x devtmpfsto hide given filesystem types from the output.
du: “Disk Usage” displays the disk space used by directories:$ du -sh $HOME:-shfor “human readable” and “summary”, lists the size of each directory within$HOME.$ du -sh $HOME/*: Same as previous but for all subdirectories within$HOME.$ du -ah --time. Shows the time of the last modification to any file in the directory or subdirectory.--timewith the-ahflags is very useful e.g. someone writes files somewhere by accident and you need to find where.
fdisk: Dialog-driven program to see and manipulate disk partition table:fdisk -l: List the system’s partition scheme.fdisk -l | grep "Disk /": See all the available disks.fdisk /dev/sdc: Enter the interactive mode to manipulate the partition table of the disk/dev/sdc
-
mkfs.ext4 /dev/sdc1: Formats the partition/dev/sdc1in ext4 file system format. - Interesting threads about ZFS:
- “what is the point of ZFS with only 1 disk”.
- “benefit/risk of ZFS with only 1 disk” (also includes the commands for a little ZFS experimentation).
cURL
Great tutorial on how to use cURL: https://curl.se/docs/httpscripting.html
$ curl -O https://testdomain.com/testfile.tar.gz: Download the filetestfile.tar.gz.$ curl -o mydownload.tar.gz https://testdomain.com/testfile.tar.gz(little ‘o’): Download to the filemydownload.tar.gz.$ curl -I https://www.google.com: Query the header of a server (same as-head).$ curl -k https://localhost/my_test_endpoint: Ignore invalid or self-signed certificates (same as--insecure).- Make a POST request (through parameters and JSON):
$ curl --data "param1=test1¶m2=test2" http://test.com$ curl -H 'Content-Type: application/json' --data '{"param1":"test1","param2":"test2"}' http://www.test.com
$ curl -X 'PUT' -d '{"param1":"test1" "param2":"test3"}' \http://test.com/1: Specify a type of request (here ‘PUT’).$ curl -u <user:password> https://my-test-api.com/endpoint1: Basic Authentication for various protocols (same as-user).- Update name resolution: test an API before deploying and want to hit in the endpoint in the test machine rather than the actual endpoint, you can pass in a custom resolution for that request: Works similarly to
/etc/hostshost-resolution. - Upload a file: curl with the -F option emulates a filled-in form when the user has clicked the submit button. This option causes curl to POST data using the Content-Type multipart/form-data:
$ curl -F @field_name=@path/to/local_file <upload_URL>$ curl -F @field_name=@path/to/local_file_1, @field_name=@path/to/local_file_2, @field_name=@path/to/local_file_3, <upload_URL>
$ curl -w "%{time_total}\n" -o /dev/null -s www.test.com: Use-wto display information (stdout) after a transfer.total_timeis one of the interesting parameters curl returns
wget
- Download a complete remote directory, includes no parent and recursive to only get the desired directory.
$ wget --no-parent -r http://WEBSITE.com/DIRECTORY
Cryptography
- The difference between seed words and private key: https://youtu.be/Y_A3j8GzaO8
Remote Access
Spare yourself the pain, learn good habits, save tones time and avoid getting locked out of your system by really understanding how SSH (a.k.a Secure Shell or Secure Socket Shell) works, how it allows you to connect a remote machine, execute commands, upload and download files.
- What is the difference between Telnet and ssh? A good VIDEO explaining this very well.
- OpenSSH
- .ssh client configuration (
~/.ssh/config) - How to setup and manage ssh keys: https://goteleport.com/blog/how-to-set-up-ssh-keys/
ssh-keygen: Generate a new key pair. e.x.$ ssh-keygen -t ecdsa -b 521ssh-keygen -R 5.73.114.57: Removes all keys belonging to host 5.73.114.57 from a known_hosts file. This is convenient when you rebuild a machine causing its fingerprint to change making ssh complain about “REMOTE HOST IDENTIFICATION HAS CHANGED!”.passphrasessh-copy-id: Copy your public key on the server machine’s~/.ssh/authorized_keys~/.ssh/known_hosts: SSH security file that stores the public keys of all remote hosts you’ve connected to via SSH. On subsequent connections, SSH checks if the server’s key matches what’s stored in this file. This protects against “man-in-the-middle attacks” (SSH will warn you if someone intercepts your connection and presents a different key) and if the server’s host key changes unexpectedly. Each time you connect to a remote server via SSH for the first time it is added in this file. Entries can be removed in this file usingssh-keygen -R(with the option-Roption) or manually (open with an editor and remove entries manually).ssh-agent: Will save you a LOT of time (key management, auto re-connect e.g. when your laptop goes to sleep or reboots …).ssh-add -l: Displays the fingerprint of all identities currently represented by the agent.ssh-add: Add your rsa keys to the ssh-agent.
Use ssh auto login (auto login using public and private keys pair to be specific) as it is also significantly more secure than basic password-based login. Bellow is a real time illustration of ssh failed login attempts initiated from the Internet (bots, hackers, you name it) on a machine with password authentication left enabled (instead of using ssh auto login).
For reference:
$ssh root@192.168.0.155
#
IP addresses (here 192.168.0.155) are not “human friendly”. You can associate an IP address to an arbitrary name, easier to remember. This can be configured in your ssh configuration file ~/.ssh/config. Here is an example in its simplest form:
Host console_jay
  HostName 192.168.0.155
  User root
You can now use the following simple syntax instead to connect:
$ ssh console_jay
Tailscale
This is all very nice until you change environment or move your hardware to another network: A new IP address will be assigned to the machine and the shorthand console_jay will no longer work, you now have to figure out what the new IP address of your machine (scan the network or physically connect to serial) which is frustrating and time consuming.
A more effective way to deal with this issue and streamline remote access altogether is to use WireGuard/Tailscale. Tailscale basically hides all the nitty gritty of ssh by managing the VPN for you in the background.
Have a look at this Tailscale Quick tutorial.
To enable Tailscale:
- Create credentials on https://login.tailscale.com.
- Install and run the Tailscale service on each machines you want to have remote access to.
- Attach each of the machines to the VPN.
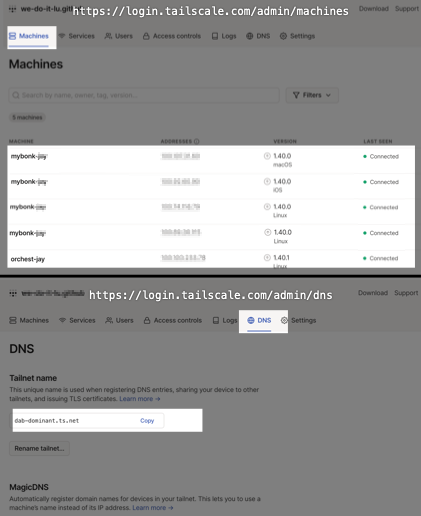
With tailscale on you can now refer to your remote machine anytime anywhere through its Tailscale “Magic DNS” name:
$ tailscale ssh console_jay@dab-dominant.ts.net
Or even just:
$ tailscale ssh console_jay
Note that Tailscale’s “Magic DNS” and ssh commands are transparently wrapped through the Tailscale VPN. So $ ssh console_jay will work as well as $ tailscale ssh console_jay.
Commonly used:
# tailscaled
$ tailscale help
$ tailscale login
$ tailscale up
$ tailscale down
$ tailscale status
$ tailscale netcheck
$ tailscale ssh console_jay
How to SSH to machine A via machine B
This is done using ssh “port forwarding” using netcat (nc).
You can ssh to machine A via machine B by adding similar entries in your ~/.ssh/config:
Host machine_B          # Machine B definition
Hostname 12.34.45.56    # Change this IP address to the address of machine b
User operator           # Change the default user accordingly

Host machine_A          # Machine A definition (the target host)
ProxyCommand ssh -q machine_B nc hostname.or.IP.address.internal.machine 22
Now you can reach Machine A directly having Machine B used in the back-end transparently. You have a single SSH host target name to reach Machine A, you can as well use it in ssh, scp, sftp …
scp somefile user@machine_A:~/
rsync
rsync uses a delta transfer algorithm and a few optimizations to make the operation a lot faster compared to scp. The files that have been copied already won’t be transferred again (unless they changed since). Can be run ad-hoc on the command line or configured to run as a deamon on the systems to keep files in sync.
rsync allows to restart failed transfers - you just reissue the same command and it will pick up where it left off, whereas scp will start again from scratch.
rsync needs to be used over SSH to be secure:
-
Example 1: From local to local (instead of using
scp):$ rsync -avz --partial --inplace --omit-dir-times --append --progress --exclude '*/*.lock' /unmountme/bitcoin/{blocks,chainstate,indexes} /data/bitcoin - Example 2: Same thing (local to local) but also gives a visual indication of the copy progress as well as completion time estimate (‘ETA’):
$ rsync -avz --partial --inplace --omit-dir-times --append --stats --exclude '*/*.lock' /unmountme/bitcoin/{blocks,chainstate,indexes} /data/bitcoin | pv -lep -s $(find /unmountme/bitcoin/{chainstate,blocks,indexes} -type f | wc -l) - Example 3: Same thing but to a remote server (over the network as opposed to locally):
$ rsync -avz --partial --inplace --omit-dir-times --append --stats --exclude '*/*.lock' /data/bitcoin/{blocks,chainstate,indexes} bitcoin@192.168.0.127:/data/bitcoinNetwork
### Common tools
autossh: Program that starts a copy of ssh and monitors it, restarting it as necessary should it die or stop passing traffic.ping: send ICMP ECHO_REQUEST to network hostslnstats: Commonly used to periodically print a selection of statistical values exported by the kernel.-
ss: Display various sockets information. Similar to netstat. e.x.$ ss -tlnp | grep 8080### Speed test - https://www.speedtest.net ### Scanners
-
findssh: Super quick command line tool that scans an entire IPv4 subnet in less than 1 second. Without NMAP. It is extremely quick but sometimes it misses some hosts so run it a couple of time to be sure it scanned them all.
Example to scan the complete network for sshd listening:
$ python3 -m findssh -b 192.168.0.1 -s ssh -v searching 192.168.0.0/24 DEBUG:asyncio:Using selector: EpollSelector DEBUG:root:[Errno 111] Connect call failed ('192.168.0.19', 22) (IPv4Address('192.168.0.82'), 'SSH-2.0-OpenSSH_8.4p1 Debian-5+d') (IPv4Address('192.168.0.136'), 'SSH-2.0-OpenSSH_9.1') (IPv4Address('192.168.0.106'), 'SSH-2.0-OpenSSH_8.4p1 Debian-5+d') DEBUG:root:[Errno 111] Connect call failed ('192.168.0.150', 22) (IPv4Address('192.168.0.100'), 'SSH-2.0-OpenSSH_7.4') DEBUG:root:[Errno 111] Connect call failed ('192.168.0.44', 22) - Angry IP Scanner: Scans LAN and WAN, IP Range, Random or file in any format, provides GUI as well as CLI.
### Tor
- .onion
- tor hidden services
- Tor browsers (https://www.torproject.org/download/)
- torify / torsocks
### I2P
- Tor vs I2P (https://www.cloudwards.net/i2p-vs-tor/)
tmux & tmuxinator
… or alternatives like GNU Screen, Terminator, Byobu, .etc…
tmux for beginners:
- part 1: https://dev.to/iggredible/tmux-tutorial-for-beginners-5c52
- part 2: https://dev.to/iggredible/useful-tmux-configuration-examples-k3g
tmux source-file ~/.tmux.conf
tmux new -s MY_SESSION
tmux list-keys
tmux list-sessions / $tmux ls
tmux kill-session -t name_of_session_to_kill : Kills a specific session.
tmux kill-session -a : Kills all the sessions apart from the active one.
tmux kill-session : Kills all the sessions.
tmux kill-server : Kills the tmux server.
tmux-resurrect and tmux-continuum: Tmux plugins to persist sessions across restarts.
tmux attach (or tmux a): attaches to the most recently used tmux session on the default server/socket.
tmux a -t myproject: Attaches to the specified on the default server/socket. project (use tmux list-sessions).
tmux shortcuts
- Sessions
- List sessions and switch to a different session:
Prefix + s(ortmux lsfollowed bytmux attach -t SESSION). - Detach a session:
Prefix + dortmux detach - Kill a session:
tmux kill-session -t MY_SESSION
- List sessions and switch to a different session:
- Windows:
- Create a window:
Prefix + cortmux new-window -n MY_WINDOW - Close a pane / window:
Ctrl + dorPrefix + x - Switch to a different window:
Prefix + n(next),Prefix + p(previous) andPrefix + N(whereNis the window index number, zero-based). - Kill a window:
tmux kill-window -t MY_WINDOW
- Create a window:
- Panes
- List all the panes:
Prefix + q(ortmux list-panes). - Jump into a specific pane:
Prefix + qfollowed by the pane number you want to jump into. - Move to next pane:
Prefix + o - Switch to last pane:
Prefix + ;tmuxinator
- List all the panes:
tmuxinator is a tool that allows you to easily manage tmux sessions by using .yaml files to describe the layout of a tmux session, and open up that session with a single command.

tmuxinator new [project]: Create a new project file with given name and open it in your editor.tmuxinator list: List all tmuxinator projects.tmuxinator copy [project] [copy_of_project]: Copy an existing project to a new project and open it in your editor.tmuxinator delete [project_a] [project_b] ...: Deletes given project(s).tmuxinator start -p your_tmuxinator_config.yml: Start tmuxinator using custom configuration file (as opposed to it picking it up from default location like˜/.config/tmuxinator\).tmuxinator start console -n "console_jay" extra_param="any_string": Start a sessionconsole, assign it project name “console_jay” and extra arbitrary parameter “extra_param” to pass value “any_string”.tmuxinator stop [project]: Stop a tmux session using a project’s tmuxinator config.
The following command allows to access a remote tmuxinator over ssh. It is very powerful because the sessions are persisted even if you close the ssh connection and reconnect. The remote tmux and tmuxinator are used so they need to be installed on the remote machine. Similarly the configuration files .tmux and .tmuxinator are looked for in the home directory of the user you ssh with on the remote server.
ssh -o TCPKeepAlive=no -t admin@192.168.0.97 "cd '.' ; tmuxinator start console -p .tmuxinator.yml ; sh --login"
processes
ps,pstree,topsystemdman systemd.unitman systemd.serviceman systemd.directives
- hostnamectl: Query and change the system hostname
and related settings.
hostnamectl statushostnamectl hostname: Query hostname.hostnamectl hostname <name>: Change hostname.
-
systemctl statussystemctl status bitcoindsystemctl start bitcoindsystemctl restart bitcoindsystemctl stop mempool fulcrumsystemctl enable --now bitcoind-
systemctl disable bitcoind systemctl list-unit-files --type service -all: List all the services on your system and their status.- Show all the running processes:
systemctl --type=service --state=running(where--statecan be any ofrunning,dead,exited,failedorinactive). systemctl daemon-reload: Reload systemd files. If you change a service file in /etc/systemd/system/, they will be reloaded.systemctl cat bitcoind: Show the service definition.systemctl show bitcoind: Show the service parameters.
- journalctl
- Show only kernel messages:
journalctl -k - Show messages from a specific boot (most recent by default or from specified BOOT_ID):
journalctl -b - As previous but displays only the errors, if any:
journalctl --no-pager -b -p err - List previous boots:
journalctl --list-boots - Display the timestamps in UTC:
journalctl --utc journalctl --since "2015-01-10" --until "2015-01-11 03:00"journalctl --since yesterdayjournalctl --since 09:00 --until "1 hour ago"journalctl -p err -bwhere option ‘-p’ can be any of:0: emerg1: alert2: crit3: err4: warning5: notice6: info7: debug
journalctl --no-fulljournalctl --no-pagerjournalctl -b -u bitcoind -o json-
journalctl -b -u bitcoind -o json journalctl -u bitcoind.servicejournalctl -u bitcoind.service -u clightning.service --since today
- Show only kernel messages:
- logger: Write messages directly to Log Files.
certificate
- authority
- expiration
- update
http vs. https
OS-layer firewall
What is the difference between IPtables and UFW Linux firewalls?
UFW is built upon IPtables, IPtables a very flexible tool but it’s more complex as compared to UFW. Also IPtables requires a deeper understanding of TCP/IP, which might not be the case with every Linux user, so UFW is the solution. UFW allows the user to configure firewall rules easily using IPtables under the hood. Hence, for an average Linux user UFW is the best way to get started with setting up different firewall rules.
We discuss and use UFW in our scope.
In NixOS the following commands are replaced by parameters in the configuration file (networking.firewall.allowTCPPorts .etc…) you should not run them manually.
$ sudo ufw allow 9999: Open port 9999.$ sudo ufw enable: In caseufwis not running (check with sudoufwstatus).$ netstat -ano: See what ports are open and what processes uses to them.
Network / ports
Check all listening ports with process info: ss -tlnp
- -t = TCP ports
- -l = listening ports only
- -n = show port numbers (not service names)
- -p = show process using the port
Or the older netstat command: netstat -tlnp
Check a specific port: ss -tlnp | grep :9735
Check what ports a specific process is using: lsof -i -P -n | grep bitcoind
The ss command is the modern replacement for netstat and is generally faster.
partitions / filesystems
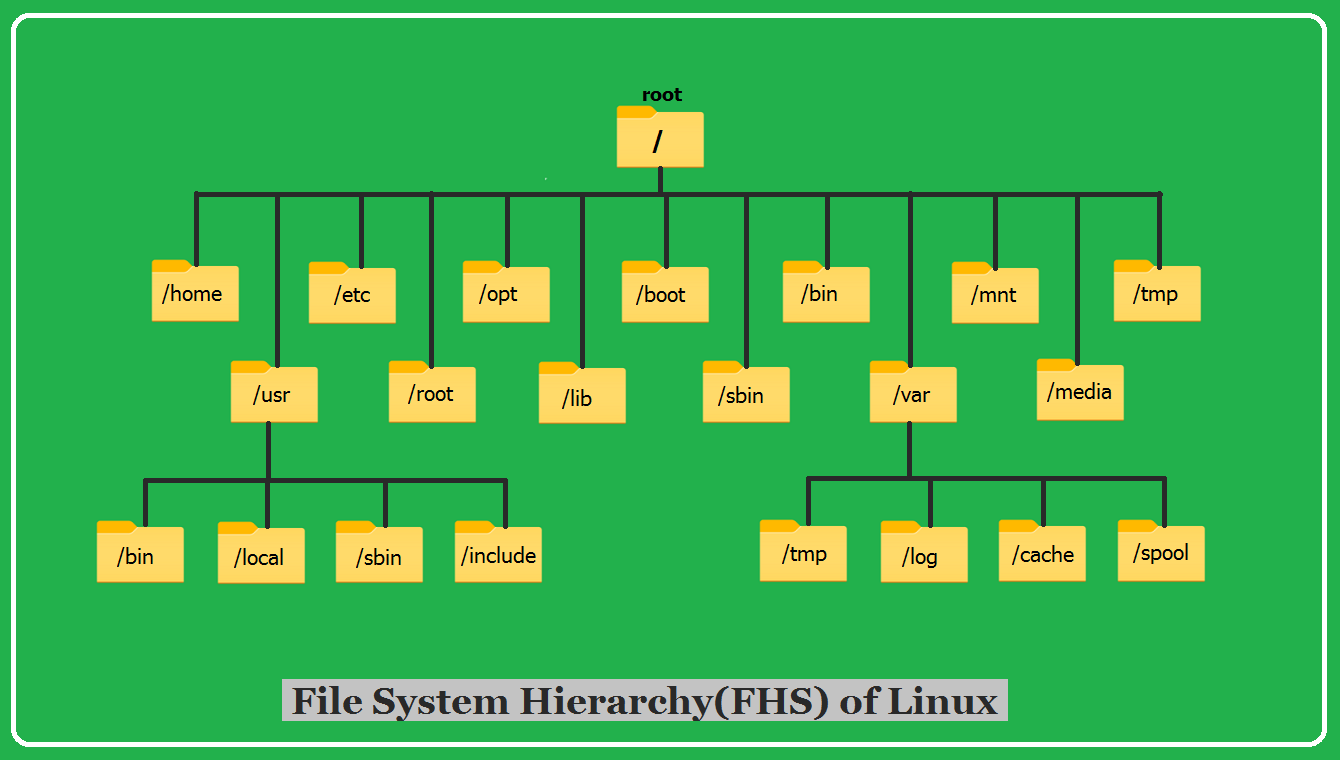
findmnt: Lists all mounted filesytems or search for a filesystem. It is able to search in /etc/fstab, /etc/fstab.d, /etc/mtab or /proc/self/mountinfo. If device or mountpoint is not given, all filesystems are shown.//mnt/var/etc/tmp/lib- .etc…
UEFI vs. Legacy Boot
Privacy tools
- deviceinfo.me: Web-based tool allowing you to see detailed information about the fingerprint you expose on the Internet: Kind of OS, browser, IP address, geolocation, real time mouse position, display, speakers, microphone, device motion, to name a few…
- Mullvad browser: A free and open-source web browser designed to significantly reduce online tracking and minimize browser fingerprinting. It is developed by Mullvad VPN in collaboration with the Tor Project. It’s a good compromise before having to use Tor browser as Mullvad does not force all traffic through the Tor network by default: It relies your VPN to mask IP address thus it is quicker than using the Tor network.
- Tor browser: A free and open-source web browser (built on Mozilla Firefox and developed by the Tor Project) specifically designed for strong privacy and anonymity online since all browsing traffic is routed through the Tor network. It is recommended for users who require very strong online anonymity (journalists, activists, and users living in restrictive environments or seeking to avoid censorship, surveillance, or location-based targeting).
- Tor network: The Tor network is a decentralized, global system of volunteer-run servers (relays) that enables anonymous communication by obscuring a user’s IP address and routing internet traffic through multiple encrypted layers, similar to an onion. This process, known as “onion routing,” hides your location and browsing history from your ISP, local network observers, and the websites you visit, making it a powerful tool for online privacy and to avoid censorship.
- NymVPN: NymVPN deploys noise to make traffic patterns untraceable. It runs on a decentralized, permissionless mixnet, ensuring that even Nym cannot log any data by design. It employs open-source cryptographic protocols to enable secure and anonymous packet transmission.
- DnsLeakTest: A DNS leak occurs when using a VPN or similar privacy-focused network, where DNS requests still go to your ISP’s server instead of through the privacy-focus network. This exposes your online activity and IP address, undermining the privacy goals of using a VPN. DnsLeakTest is a Web-based tool that tests for such leaks.
- BrowserLeaks: Tool similar to DnsLeakTest.
- OpenSnitch: Open-source application firewall for Linux, inspired by the popular Little Snitch firewall on macOS. It monitors outgoing network connections on a per-application basis and alerts the user whenever a program attempts to access the internet. The user can then decide to allow or block the connection either once, always, or never.
Other tools / resources
- SSHFS: Tool to safely mount a remote folder from a server to a local machine. The client extends the SSH file transfer protocol, which helps locally mount a remote file system as a disk image securely.
- Gocryptfs: Tool to perform file-based encryption. It’s fast, lightweight, well-documented. In contrast to disk-based encryption software, which operates on whole disks, gocryptfs works on individual files that can be backed up or synchronized efficiently using standard tools like sshfs or rsync. Read more about it HERE.
- VirtualBox: By Oracle Corporation. Simple, Cross-platform, Open-source, great performances, all-in-one, virtual machine program. Even though it is primarily fit for desktop usage, it can be run in headless mode.
- QEMU: Open-source machine virtualizer and emulator. It supports a wide range of hardware architectures and guest operating systems. Coupled with KVM it runs VMs that perform well because KVM is hardware-level virtualization and QEMU is a software-level virtualization. Technically, QEMU is a type-2 hypervisor.
- QuickEMU: Terminal-based tool that lets you rapidly create optimized desktop virtual machines and manage them with ease. The tool chooses the best configuration by default as per available system resources. It also downloads the image for the selected operating system. All you have to do is install the operating system as you would normally do and get started.
- QuickGUI: Makes it convenient to utilize Quickemu’s abilities to quickly create and manage multiple VMs without needing to configure anything. What’s more interesting: you do not need elevated privileges to make it work.
- KVM: “Kernel-based Virtual Machine” Baked into Linux. You can run VMs out of the box. It is a “type-1 hypervisor” a.k.a “hardware-based”. It converts the Linux host into a hypervisor to run virtual machines with bare metal performance. You can create guest/virtual machines of different operating systems too. Have a look at QuickEMU and QuickGUI for tools to make your life easier.
- Virsh: A command-line utility for managing virtual machines that are controlled by libvirt, the virtualization management library. It provides a wide range of commands to create, edit, monitor, and control VMs running on hypervisors like QEMU, KVM and many others.
- WSL: Windows Subsystem for Linux to run ELF64 Linux binaries on Windows (if you have Windows system but would like to run Linux programs and commands this is what you need if you prefer not to use a full fledged virtual machine).
- multitail: MultiTail lets you view multiple files like the original tail program. The difference is that it creates multiple windows on your console (ncurses). It can also monitor wildcards: if another file matching the wildcard has a more recent modification date, it will automatically switch to that file.
- websocketd: Small command-line tool that will wrap an existing command-line interface program, and allow it to be accessed via a WebSocket. WebSocket-capable applications can now be built very easily. As long as you can write an executable program that reads STDIN and writes to STDOUT, you can build a WebSocket server. No networking libraries necessary.
- wscat: WebSocket cat.
- Benchmaring
time: The simplest, shell built-in, tool to measure a command execution time.- Use the
$ free -mcommand to check your Linux memory usage. lshw: Small tool to extract detailed information on the hardware configuration of the machine. It can report on memory, firmware version, mainboard configuration, CPU version and speed, cache configuration, bus speed, etc. in various output format. e.x.$ lshw -short,$ lshw -json…- powertop: Tool to access various powersaving modes in userspace, kernel and hardware. Monitors processes and shows which utilizes the most CPU allowing to identify those with particular high power demands.
- stress-ng: Stress test a computer system in various selectable way.
- Byte UNIX Bench: Since 1983, provide a basic indicator of the performance of a Unix-like system; hence, multiple tests are used to test various aspects of the system’s performance.
- geekbench: Simple tool to quickly benchmark a system’s performance (How to run on Linux)
- ATTO: Industry grade Disk Benchmark for macOS to help measure storage system performance.
- iperf3: Simple tool to quickly benchmark the maximum
achievable bandwidth on IP networks.
- Run iperf3 as a server:
iperf3 -s - Run an iperf3 server on a specific port:
iperf3 -s -p port - Start bandwidth test:
iperf3 -c server - Run iperf3 in multiple parallel streams:
iperf3 -c server -P streams - Reverse direction of the test. Server sends data to the client:
iperf3 -c server -R
- Run iperf3 as a server:
lscpu: Part ofutil-linux, command to display information about the CPU architecture.lsmem: Part ofutil-linux, command to list the ranges of available memory with their online status.memtester: Effective userspace tester for stress-testing the memory subsystem. It is very effective at finding intermittent and non-deterministic faults.memusage: Profile memory usage of a program.dmesg: Shows Kernel Messages.dmesg -n 1: Temporarily suppress all kernel logging to the console.
- inxi: A full featured CLI system information tool, example:
$ inxi -Fxzb --usb
tree: Outputs a depth-indented listing of files making it easy to visualize the organization of files and directories within a given path. With no arguments the tree lists the files in the current directory. When directory arguments are given, the tree lists all the files or directories found in the given directories each in turn.- pv: Pipe Viewer, command-line tool that allows to monitor data being sent through pipe. It provides the ability to monitor progress of a given application (time elapsed, completed progress, data transfer speed, ETA).
- glances utility: System cross-platform monitoring tool. It allows real-time monitoring of various aspects of your system such as CPU, memory, disk, network usage etc. as well as running processes, logged in users, temperatures, voltages etc.
- htop: Similar to glances above.
-
btop: Similar tool to
glancesandhtopabove. - VPN / tunnels
- Wireguard This VPN technology is built into the kernel; Client apps widely available (e.x. Tailscale), allows to connect to your local network remotely using a simple QR code to authenticate.
-
Tailscale: Quick tutorial Rapidly deploy a WireGuard-based VPN, a “Zero-config VPN”: Automatically assigns each machine on your network a unique 100.x.y.z IP address, so that you can establish stable connections between them no matter where they are in the world, even when they switch networks, and even behind a firewall. Tailscal nodes use DERP (Designated Encrypted Relay for Packets) to proxy encrypted WireGuard packets through the Tailscale cloud servers when a direct path cannot be found or opened. It uses curve25519 keys as addresses.
- Zerotier: Another VPN alternative.
- ngrok: Exposes local networked services behinds NATs and firewalls to the public internet over a secure tunnel. Share local websites, build/test webhook consumers and self-host personal services.
- Sign up (or login) to get a TOKEN then run:
$ ngrok config add-authtoken TOKEN $ ngrok http 8000
- Sign up (or login) to get a TOKEN then run:
- ecash system
- How To Make a Mint: The Cryptography Of Anonymous Electronic Cash by Laurie Law, Susan Sabett, Jerry Solinas, NSA (National Security Agency), 18 June 1996. (Did the NSA create bitcoin?).
- Cashu: Cashu is a free and Open-source Chaumian ecash system built for Bitcoin. Cashu offers near-perfect privacy for users of custodial Bitcoin applications. Nobody needs to knows who you are, how much funds you have, and whom you transact with.
- XSATS.net: bitcoin/sats to and from world currencies, spot price or for any given date.
- md5calc: Website to calculate the Hash of any string.
Common bitcoin-related commands
- Check bitcoin deamon is running:
$ systemctl status bitcoind
Using bitcoin’s command line interface bitcoin-cli
bitcoin-cli is the most straightforward way to execute bitcoin RPC commands (full list of RPC commands), here are some of the most commonly used:
$ bitcoin-cli -getinfo$ bitcoin-cli getblockchaininfo- It is a good idea to pipe through
jqto get pretty JSON output formatting or extract specific data, for instance:$ bitcoin-cli getblockchaininfo | jq '.'to get the output nicely formatted in JSON format.$ bitcoin-cli getblockchaininfo | jq '.verificationprogress'to extract a specific element in the top-level of the JSON output.
- General Info
$ bitcoin-cli help$ bitcoin-cli help getblockchaininfo$ bitcoin-cli getblockchaininfo$ bitcoin-cli getindexinfo$ bitcoin-cli getpeerinfo$ bitcoin-cli getpeerinfo |jq '.[] | [ .id, .addr ]'to extract only the values of each of the peers id and address.$ bitcoin-cli getpeerinfo |jq -r '.[] | [ .id, .addr ] | @tsv'same as previous but displayed as a table.$ bitcoin-cli getpeerinfo | jq -r '(["ID","ADDR"] | (., map(length*"-"))), (.[] | [.id, .addr]) | @tsv'same as previous but adding a header to the table.$ bitcoin-cli getnetworkinfo$ bitcoin-cli getmininginfo
- Block Info
$ bitcoin-cli getblockcount$ bitcoin-cli getbestblockhash$ bitcoin-cli getblock <hash>$ bitcoin-cli getblockhash <index>
- Transaction Info
$ bitcoin-cli getwalletinfo$ bitcoin-cli createwallet$ bitcoin-cli listreceivedbyaddress 0 true: List of accounts on the system.$ bitcoin-cli setaccount 1GBykdD628RbYPr3MUhANiWchoCcE52eW2 myfirstaccount: To associate an existing address (here : 1GBykdD628RbYPr3MUhANiWchoCcE52eW2) to an account name.$ bitcoin-cli sendfrom myfirstaccount 1AYJyqQHCixxxxxxffevxxxxQosCWqn1bT 0.15: Send 0.15 bitcoin to address1AYJyqQHCixxxxxxffevxxxxQosCWqn1bT$ bitcoin-cli getrawmempool$ bitcoin-cli getrawtransaction <txid>$ bitcoin-cli decoderawtransaction <rawtx>
Using bitcoin JSON-RPC API calls
The bitcoin JSON-RPC API allows to interact with bitcoin deamon in a varierty of ways: cURL, JavaScript, Python …
First you need to make sure Bitcoin is setup to accept Remote Procedure Calls (RPC):
For instance you could run getnetworkinfo using the following cURL:
curl -u public:2S8PWBZ71wMXdrsAxL21 -d '{"jsonrpc": "1.0", "id": "curltest", "method": "getnetworkinfo", "params": [] }' -H 'content-type: text/plain;' http://mybonk-jay:8332/
Most noticably you need to use the option -u (or --user) to pass valid credentials (here username public and password 2S8PWBZ71wMXdrsAxL21) otherwise you will get an 401 Unauthorized error. Username is either public or priviledged, their password in /etc/nix-bitcoin-secrets/bitcoin-rpcpassword-{public|priviledged}.
Also make sure that the method you call (getnetworkinfo, getpeerinfo, listwallets…) is defined in the RPC whitelist.
You can use curl with the -v (verbose) parameter to see the sent headers: The text after the Basic keyword is the base64 encoded text string of the username:password that were passed with the -u parameter.
Authorization: Basic cHVibGljOjJTOFBXQlo3MXdNWGRyc0F4TDIx
To manually generate this base64 encoded credentials you can simply use:
$ echo -n "username:password" | base64 -w0
cHVibGljOjJTOFBXQlo3MXdNWGRyc0F4TDIx
To test this end to end, you can remove -u username:password and substitute with -H Authorization: Basic cHVibGljOjJTOFBXQlo3MXdNWGRyc0F4TDIx, the authentication will work too:
$ curl -v -d '{"rpc": "1.0", "id": "curltest", "method": "getnetworkinfo", "params": [] }' -H 'content-type: text/plain;' -H 'Authorization: Basic cHVibGljOjJTOFBXQlo3MXdNWGRyc0F4TDIx' http://mybonk-jay:8332/
In conclusion, you could even run these RPC commands without using cURL: You would just need to base64 encode the username:password combination and set the HTTP Authorization header with the type as Basic along with the base64 encoded string.
Common clightning-related commands
This is a nice cheatsheet for https://github.com/grubles/cln-cheatsheet
- Check bitcoin deamon is running:
$ systemctl status clightningUsing clightning’s command line interface
lightning-clilightning-cliis simply a wrapper over core-lightning JSON RPC to interact with the lightning deamon, and print the result.$ lightning-cli --version $ lightning-cli help - Complete list of all JSON-RPC commands: HERE
- Simple examples:
$ lightning-cli --version $ lightning-cli help $ lightning-cli getchaininfo $ lightning-cli getinfoSomething fun to do is to stream stats from one node (the “source”) to another (the “destination”):
-
On the “source” machine run the following command to send 100 times between 2000 and 65000 sats using keysend to node with pubkey
0278e764e98cf94ef1f33684bac0f7cc85b3d445465cc4c0171d07107079aaf4cc(replace by the pubkey of your destination node):$ for i in {1..100}; do lightning-cli keysend 0278e764e98cf94ef1f33684bac0f7cc85b3d445465cc4c0171d07107079aaf4cc `shuf -i 2000000-65000000 -n 1`; done -
Now on the “destination” machine run the following command to observe lightning channels grow as the payments are processed:
$ watch "lightning-cli listfunds | jq '.channels[] | .our_amount_msat'"
Another example is sending funds onchain using lightning-cli, which is also possible.
- Generate a new
p2trformat (taproot) bitcoin address (bech32is the default):$ lightning-cli newaddr p2tr { "bech32": "tb1qmws65ajdzfk3etqzumfk9ujumjhj8tgvk7rwys" } - Now send funds to the address you have generated in the previous step:
$ lightning-cli withdraw tb1qmws65ajdzfk3etqzumfk9ujumjhj8tgvk7rwys 10000000The command will take a couple of seconds to complete and will return the
txid(transaction id) along with other data. The commandwithdrawhas a few optional parameters, have a look at its documentation.
Using clightning JSON-RPC API calls
Similarly to the bitcoin JSON-RPC, the clightning JSON-RPC API allows to interact with clightning deamon in a varierty of ways: cURL, JavaScript, Python …
Corelightning documentation is very well done with clear examples.
Podcasts
- Citadel Dispatch #37, Sep 2021: Building software from source code, reproducible builds, reducing trust, coin selection, coin control, coinjoin
- Citadel Dispatch #42, Nov 2021: Security focused bitcoin nodes with @nixbitcoinorg, @n1ckler, and @seardsalmon
- nixbitcoin-dev with Stefan Livera: A security focused bitcoin node.
Other projects and references
- Seed-signer: Bitcoin only, Open-source, offline, airgapped Bitcoin signing device. Can also DIY.
- Blockstream Jade: Bitcoin only, Open-source hardware wallet. Can also DIY.
- Hardware Wallets comparison and audit.
- BIP39: Play around and understand 12 vs 24 word seed (mnemonic) length, does it make a difference? Entropy, splitting scrambling … (don’t forget to generate a random mnemonic and select the option “Show split mnemonic cards” to see how much time it would take to brute-force attack).

- Other package managers:
- Homebrew
- $ brew search android-platform-tools
- $ brew install android-platform-tools
- $ brew info android-platform-tools
- $ brew remove android-platform-tools
- apt
- Tea
Federations
- Homebrew
- FEDIMINT (by Fedi):
- Explanation video by Obi and Justin (Bitcoin Miami 2023): https://www.youtube.com/watch?v=_ByXD659Tcc.
- Fedimint on GitHub.
- Telegram:
- Discord.
- LIQUID (by Blockstream)
- …
- ..
For developers
- Visual Studio Code: Free, powerful, and lightweight source code editor with built-in support for JavaScript, TypeScript, Node js … and a vast ecosystem of extensions.
!TIP The following command opens a Visual Studio workspace on a remote machine. Don’t forget
ssh-remote+in the option--remote.$ code --remote ssh-remote+johndow@myremotemachine /Users/jay/github/mybonk-wiki - Great Nix language tour: https://nixcloud.io/tour
- The difference between RPC and REST
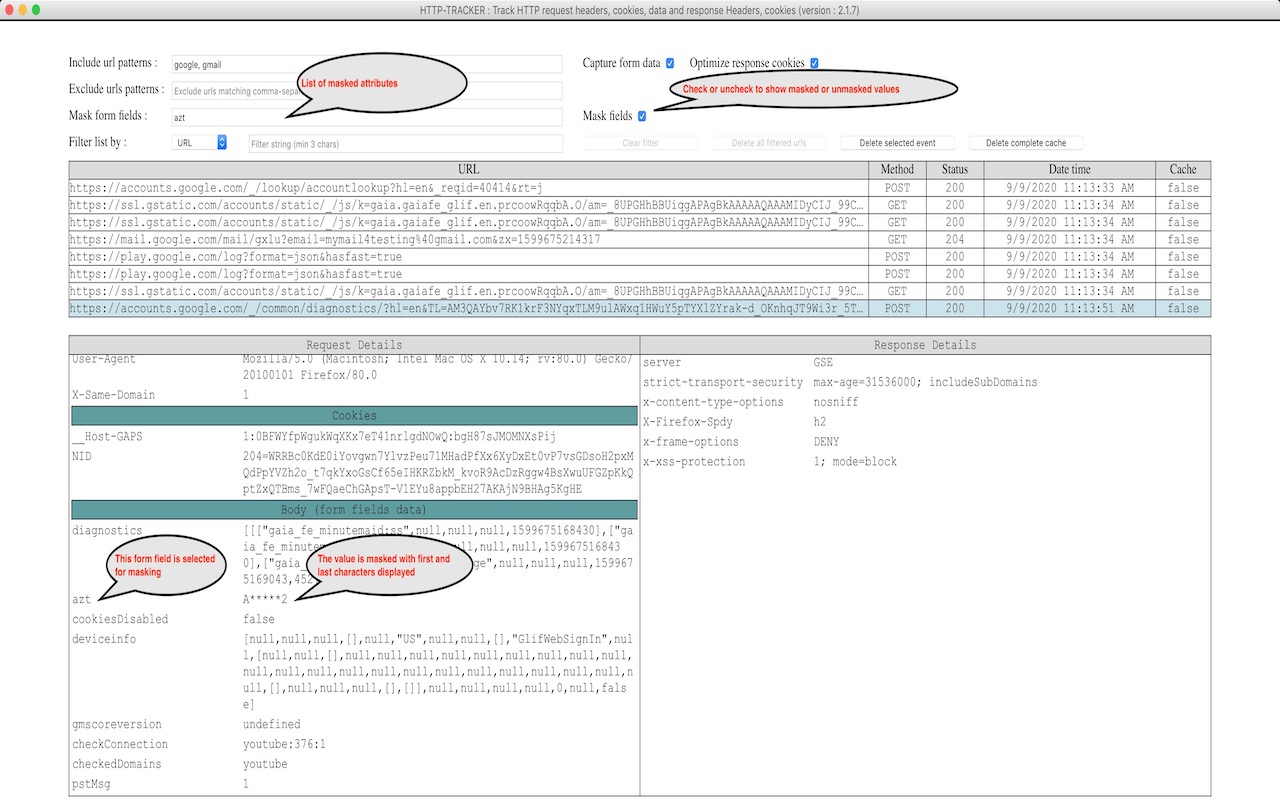
- HTTP-TRACKER Chrome extension: Allows to inspect HTTP request headers, cookies, data, response Headers, cookies and even add/modify request headers before sending requests.
- Poetry2nix: Developping Python with Poetry & Poetry2Nix: Reproducible, flexible, Python environments.
- Polar: One-click Bitcoin Lightning Networks for local app development & testing.
- Rust: Multi-paradigm, general-purpose programming language that emphasizes performance, type safety, and concurrency. It enforces memory safety—ensuring that all references point to valid memory—without requiring the use of a garbage collector or reference counting present in other memory-safe languages.
- Cargo: Package manager for Rust.
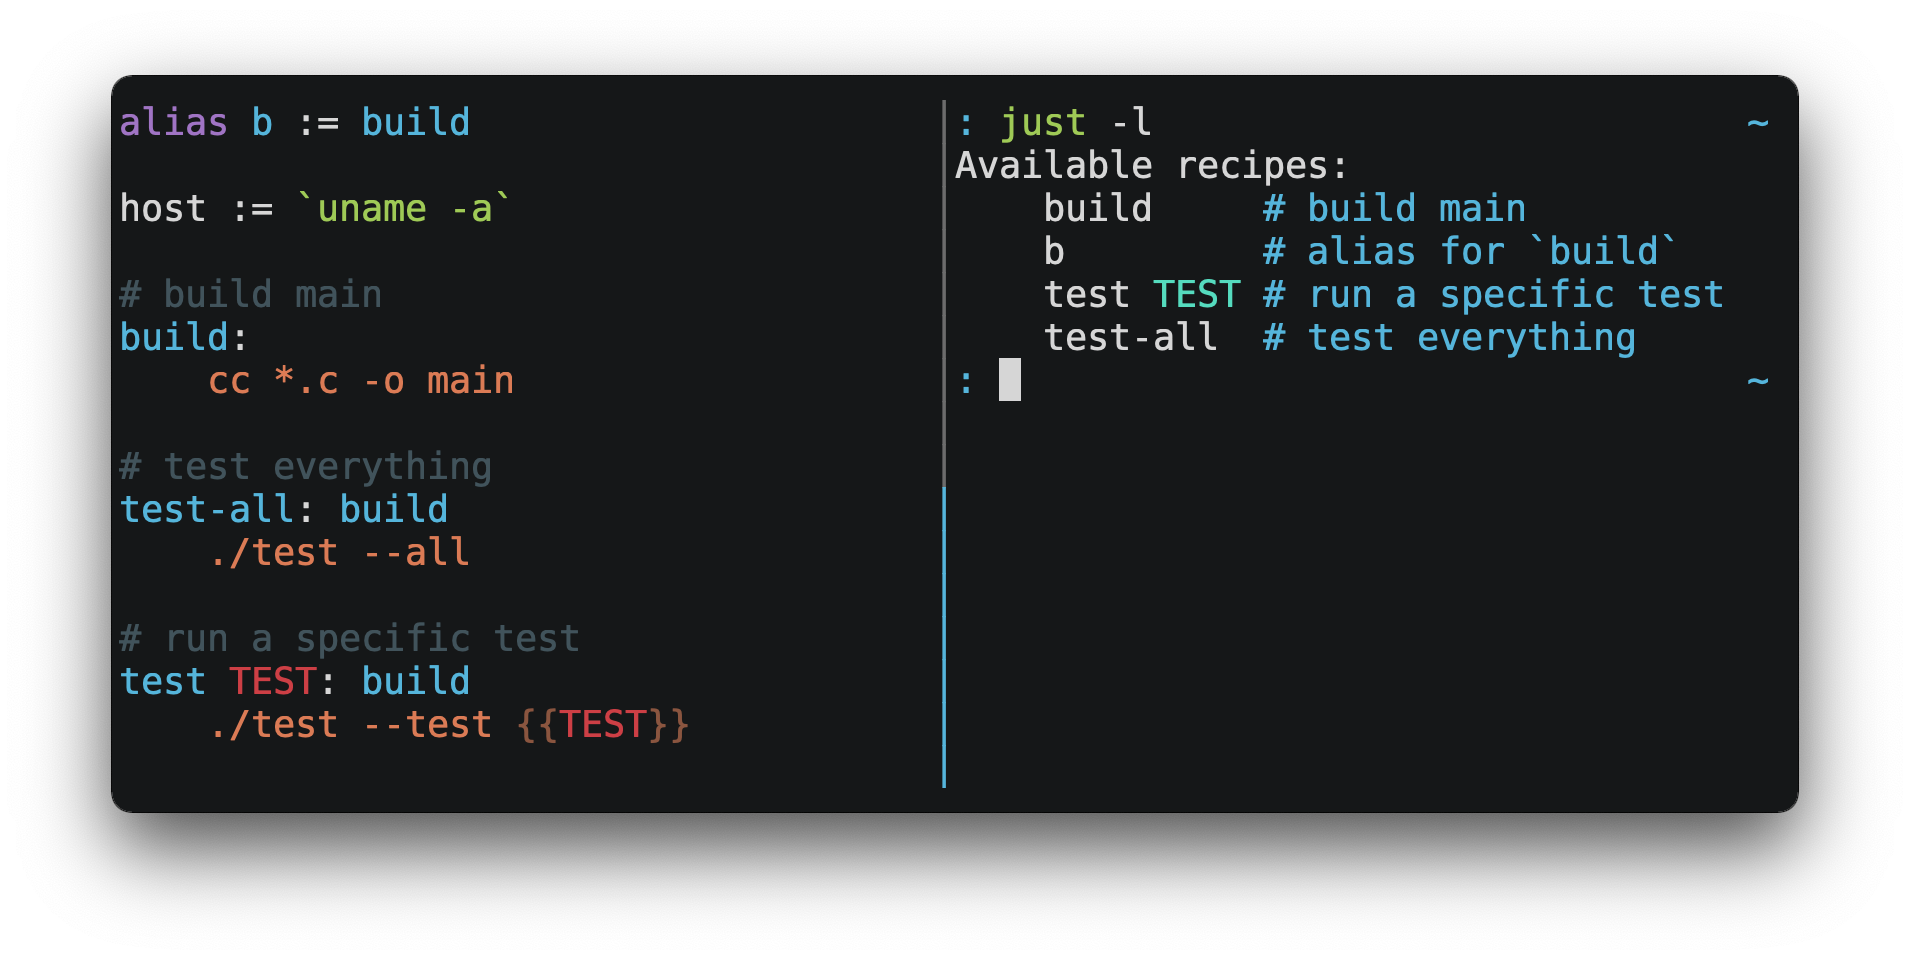
- Just: Just is a handy little tool to save and run project-specific commands.
- DuckDNS: Allows to get free dynamic DNS (forces ‘KYC’ by login using Github, Twitter, reddit or Google account). Good for testing.
- How to compile Bitcoin and run the unit and functonal tests: https://jonatack.github.io/articles/how-to-compile-bitcoin-core-and-run-the-tests
- asciinema: Record and share your terminal sessions, the simple way.
Books
- Déclaration des Droits de l’Homme et du Citoyen de 1789 https://www.conseil-constitutionnel.fr
- Document (site of Conseil Constitutionnel of France): https://www.conseil-constitutionnel.fr/node/3850/pdf
- Discours de la servitude volontaire (Étienne de La Boétie)
- Explains that servitude isn’t imposed but chosen, fostered by habit, custom, and training where people forget freedom and grow to adore rulers, becoming conditioned to obedience, with only a few resisting, but tyranny falls when the masses simply stop consenting.
- Version Française
- English Version
- The Declaration of Independence of Cyberspace (John Perry Barlow)
- Document: https://cryptoanarchy.wiki/people/john-perry-barlow
- Audio, red by the author: https://www.youtube.com/watch?v=3WS9DhSIWR0
- Users Manual for The Human Experience (Michael W. Dean)
- pdf book: https://michaelwdean.com/UMFTHE/Users_Manual_for_The_Human_Experience-eBook.pdf
- audiobook on YouTube: https://www.youtube.com/watch?v=xpJMFBpGR2s
- How Learning Works (Published by Jossey-Bass)
- Introduction to the Mac command line (on GitHub).
- Learn Bitcoin from the command line (on GitHub)
- Mastering Bitcoin (on GitHub).
- Mastering the Lightning Network (on GitHub).
- The NixOS and Flakes book: The NixOS and Flakes book.
NixOS/Nix specific
If you are actualy running NixOS operating system (as opposed to just Nix which is the package manager), you can lookup the currently active NixOS configuration. For example:
$ nixos-version
23.05.20230915.360a7d3 (Stoat)
Of course you also use the traditional Linux commands to know more:
- OS name and version in Linux:
cat /etc/os-releaseBUG_REPORT_URL="https://github.com/NixOS/nixpkgs/issues" BUILD_ID="23.05.20230915.360a7d3" DOCUMENTATION_URL="https://nixos.org/learn.html" HOME_URL="https://nixos.org/" ID=nixos LOGO="nix-snowflake" NAME=NixOS PRETTY_NAME="NixOS 23.05 (Stoat)" SUPPORT_END="2023-12-31" SUPPORT_URL="https://nixos.org/community.html" VERSION="23.05 (Stoat)" VERSION_CODENAME=stoat VERSION_ID="23.05"
-
and:
$ hostnamectlStatic hostname: mybonk-jay Icon name: computer-vm Chassis: vm 🖴 Machine ID: b93a6b5ab0384df583b2f691e312314c Boot ID: 82b819d538bd4a1a93ec046fc81111e5 Virtualization: kvm Operating System: NixOS 23.05 (Stoat) OS Support End: Sun 2023-12-31 OS Support Expired: 10month 5d Kernel: Linux 6.1.52 Architecture: x86-64 Hardware Vendor: Hardware Model: vServer Firmware Version: 20171111 Firmware Date: Sat 2017-11-11
Common Nix commands
- Nice Nix cheat sheet:
- Search the Nix ecosystem:
- https://search.nixos.org: Search Nix packages, NixOS options, Flakes.
- https://noogle.dev: Search nix functions based on type, name, description, example, category .etc..
- NixOS the “traditional” vs. the “Flakes” way:
- Flakes have been introduced with Nix 2.4
- Although still flagged as “experimental” feature it is the way forward, we advise you to learn Flakes already.
nix --version: Get running nix version.nix-info -mnix-shell: Start an interactive shell based on a Nix expression. This is distinct fromnix shell(great explanation of the difference between ‘nix-shell’ and ‘nix shell’).nix-build: Build a Nix expression. This is distinct fromnix build.nix-channelnix-collect-garbagenix-copy-closurenix-deamonnix-envnix-hashnix-instantiate(same asnix-instantiate default.nix)nix-instantiate --eval: Very easy way to evaluate a nix file.nix-instantiate --eval --strict:--stricttries to evaluation the entire result (otherwise may return<CODE>blocks).nix-instantiate --eval --json --strict: Always use--strictwith--json(otherwise<CODE>blocks may result in json not being able to parse).- Similarly with Flakes enabled you could use
nix eval -f default.nix. Note that nix eval behaves as--strict(tries to evaluation the entire result).
nix-prefetch-urlnix-store
nix repl
- Use
nix replto interactively explore the Nix language as well as configurations, options and packages.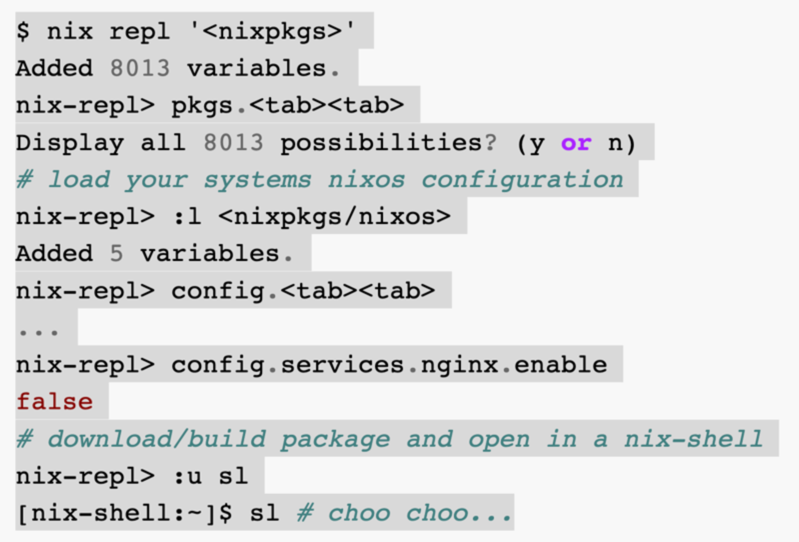
$ nix repl Welcome to Nix 2.15.0. Type :? for help. nix-repl>- Use
:?to get help on the commands -
Use
:qto quit nix-repl. - You can use autocomplete (tab, tab) from within nix-repl.
- Get the documentation of a built-in function
:doc, for instance:nix-repl> :doc dirOf - Show the logs for a derivation use
:log, for instance:nix-repl> builtins.readFile drv "Hello world" nix-repl> :log drv Hello world - load nixos configuration from a nix file (not Flake):
$ nix repl --file '<nixpkgs/nixos>' -I nixos-config=./configuration.nix - Add everything that you see passed to modules: options, config, pkgs, lib, and the other “Special ones”:
$ nix repl>:l <nixpkgs/nixos> - Similarly on Flake systems:
$ nix repl>:lf /etc/nixos
$ nix repl>nixosConfigurations.<hostname>
- Use
Garbage collection:
- Ref. the options
keep-derivations(default:true) andkeep-outputs(default:false) in the Nix configuration file. nixos-rebuild list-generations: List the available generations in a similar manner to the boot loader menu.nix-collect-garbage --delete-old: Quick and easy way to clean up your system, deletes all old generations of all profiles in/nix/var/nix/profiles. See the other options below for a more “surgical” way to garbage collect.nix-env --delete-generations old: Delete all old (non-current) generations of your current profile.nix-env --delete-generations 10 11 23: Delete a specific list of generationsnix-env --delete-generations 14d: Delete all generations older than 14 days.nix-store --gc --print-dead: Display what files would be deleted.nix-store --gc --print-live: Display what files would not be deleted.- After removing appropriate old generations (after having used
nix-envwith an argument--delete-generationsor--delete-old) - you can run the garbage collector as follows:nix-store --gc
Nix debugging
lib.debug.traceSeq <arg1> <arg2>: Print a fully evaluated value.
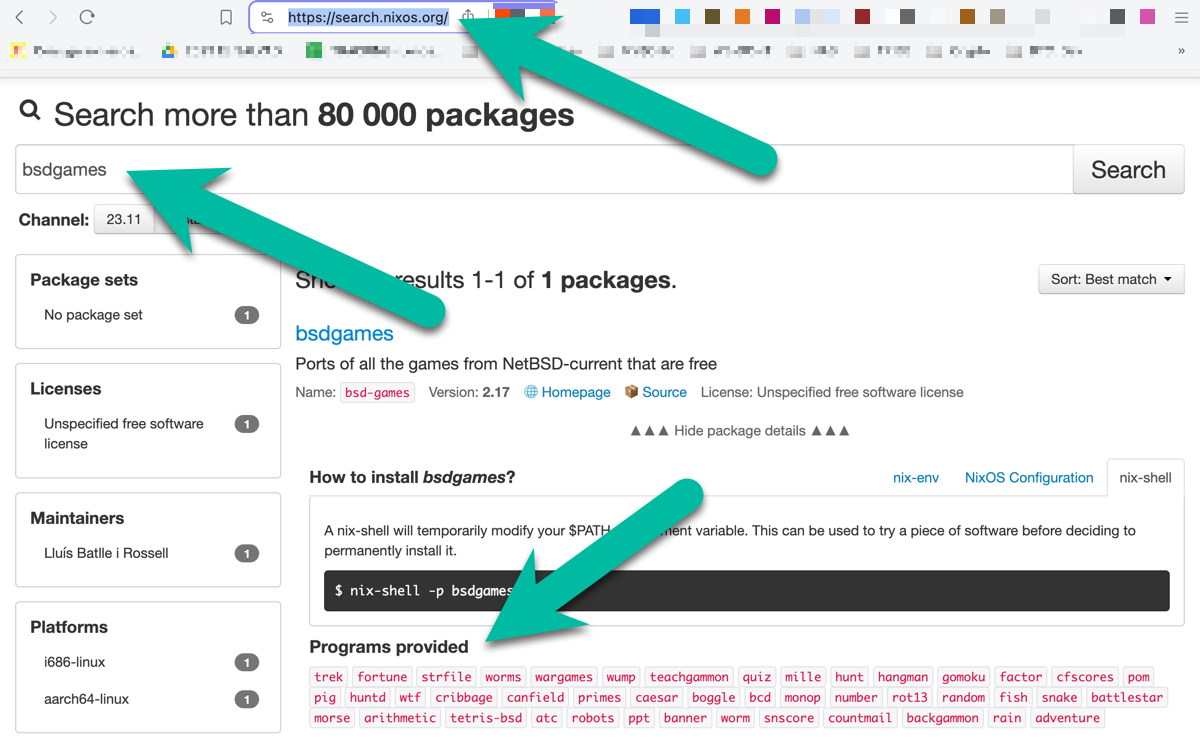
Search NixOS/Nix packages on the command line
You can search for packages using search.nixos.org:
But you can also search for packages straight from the command line, there are 2 methods to do this:
Method 1
Just use nix-shell’s autocomplete feature: Press the < tab > key as you enter the name, you’ll see all Nix package names that begin with the text you entered (takes a second or two to complete):
$ nix-shell -p asciiq
asciiquarium
Note: Nix shell autocomplete applies only on the Nix package names (not its description nor any other metadata).
Method 2
Use the nix terminal app with search:
$ nix search nixpkgs asciiquarium
* legacyPackages.x86_64-linux.asciiquarium (1.1)
  Enjoy the mysteries of the sea from the safety of your own terminal!

* legacyPackages.x86_64-linux.asciiquarium-transparent (2023-02-19)
  An aquarium/sea animation in ASCII art (with option of transparent background)
Notes:
- Whereas the nix-shell “autocomplete” seen earlier (Method 1) applies only on the Nix package names,
nix searchdoes a full-text search. - The command to be used if Flakes are enabled is
nix search nixpkgs asciiquariumelse it isnix search asciiquarium. - Add the
--jsonflag to get more information in the output (and pipe throughjqto get it in a nice readable format):$ nix search nixpkgs --json asciiquarium | jq evaluating 'legacyPackages.x86_64-linux' evaluating 'legacyPackages.x86_64-linux'{ "legacyPackages.x86_64-linux.asciiquarium": { "description": "Enjoy the mysteries of the sea from the safety of your own terminal!", "pname": "asciiquarium", "version": "1.1" }, "legacyPackages.x86_64-linux.asciiquarium-transparent": { "description": "An aquarium/sea animation in ASCII art (with option of transparent background)", "pname": "asciiquarium-transparent-unstable", "version": "2023-02-19" } }
Run a package without having to install it
This is a great feature of NixOS. For example I can open a shell with the asciiquarium package available in it:
$ nix-shell -p asciiquarium
Now get this: that command didn’t actually install anything. When I leave the shell (with exit or ctrl+d), asciiquarium is no longer there, and it doesn’t pollute my user environment.
Alternatively, if you have Flakes enabled you can us the following command (more information here):
$ nix shell nixpkgs#asciiquarium
You can play around with plenty of nifty little programs kids love:
$ nix-shell -p asciiquarium cmatrix fortune cowsay sl figlet toilet oneko
.etc…
asciiquarium: Enjoy the mysteries of the sea from the safety of your own terminal.cmatrix: Shows a scrolling ‘Matrix’ like screen on the terminal.fortune: Simple program that displays random poignant, inspirational, silly or snide phrases from a database of quotations.cowsay: Simple little ASCII art tool that prints a picture of a cow with a speech bubble message; you can enter the following command to “pipe” the output of the aforementionedfortunecommand to create your own wise cow. Try out$ fortune | cowsaysl: Animated ASCII steam locomotive with a few nice hidden optionsfiglet: ASCII banner creatorpipes: Animated pipes terminal screensaver.toilet: More ASCII fonts. For some reason, they named it toilet.oneko: Adds an animated cat to your terminal who will follow your mouse (get it?)bastet: Tetris on the command-line.ninvaders: Space Invaders on a command-line.moon-buggy: Jump, fire, on a command-line.
Many other little games are bundled in a package. The package bsdgame for instance has cool command-line games.
Various
-
nix-community/awesome-nix: “A curated list of the best resources in the Nix community.”.
-
If you are using an SSD it may be useful to enable TRIM support as well as set filesystem flags to improve the SSD performance: ` fileSystems.”/”.options = [ “noatime” “nodiratime” “discard” ]; `
Others
- Crypto Pals
- Page: www.cryptopals.com. Be scared of the emerged part of the iceberg in cryptography. Take this challenge!